Battery switch on travel trailer function is crucial for managing your RV’s power. Understanding how to use your battery switch – whether it’s a single, dual, or selector type – is key to preventing dead batteries and maximizing your off-grid adventures. This guide breaks down everything you need to know, from basic operation to advanced troubleshooting, ensuring you’re always prepared for the open road.
We’ll explore the different types of switches, their pros and cons, and how they interact with other systems like solar panels and inverters. We’ll also cover essential safety precautions and maintenance tips to keep your battery switch running smoothly for years to come. Get ready to become a battery switch expert!
Proper Battery Switch Usage
Knowing how to properly use your travel trailer’s battery switch is crucial for maintaining your power system and preventing costly repairs. This involves understanding its function, performing regular checks, and following safe operating procedures. Ignoring these steps can lead to premature battery failure, damaged appliances, and even electrical fires.
A battery switch acts as a master control, allowing you to isolate your house batteries from the trailer’s electrical system. This is vital for preventing battery drain when your trailer is stored for extended periods, or for safely performing maintenance. It also helps you manage power consumption and choose between using your house batteries or shore power.
So, you’re an audiophile who travels? Awesome! Check out this guide on building the perfect audiophile travel setup to keep your ears happy on the go. Remember to also sort out your travel insurance beforehand; getting Aon travel insurance is a smart move, ensuring your precious gear (and yourself!) are covered in case of mishaps.
Don’t forget to pack your headphones and enjoy the journey!
Pre-Trip Battery Switch Checks
Before each trip, a quick inspection of your battery switch is essential. This simple routine can prevent significant problems down the road. Check for any signs of corrosion around the switch terminals. Tighten any loose connections and clean away any corrosion using a wire brush and baking soda solution. Visually inspect the switch itself for any damage or signs of wear.
Ensure the switch is firmly in the correct position for your intended use.
Step-by-Step Battery Switch Operation
- Storage Mode (Batteries Disconnected): This is the crucial position when storing your travel trailer for an extended time. Turning the switch to this position completely disconnects your house batteries from the trailer’s electrical system, preventing parasitic drain that could lead to a dead battery.
- Both Batteries (Combined): This setting connects both your house batteries in parallel, providing maximum power output. Use this when you need the most power for running multiple appliances simultaneously, like the air conditioner and microwave.
- Battery 1 (or Battery 2): These settings allow you to use only one battery at a time. This is useful for extending the lifespan of your batteries by reducing the overall load and for testing the individual battery’s charge level. This could be important for identifying a faulty battery.
- Charging: While charging your batteries via shore power, you should typically have the battery switch in the “Both Batteries” or one of the individual battery positions, depending on your charging system’s setup. Consult your owner’s manual for specifics.
Preventing Common Battery Switch Issues
Regular maintenance is key to avoiding problems. Clean the battery terminals regularly to prevent corrosion buildup, which can hinder current flow and damage the switch. Avoid forcing the switch; if it feels stiff, investigate the cause before continuing. Use dielectric grease on the terminals to prevent corrosion. Regularly check the connections to ensure they are tight and secure.
Battery Switch and Power Consumption Management
Understanding your battery switch’s role in power management is vital for preventing unexpected battery drain. Using the switch to disconnect your batteries when not in use is a simple yet effective way to conserve power. Moreover, monitoring your power consumption and only using high-drain appliances when connected to shore power will greatly extend the life of your batteries.
This also helps you avoid running out of power during off-grid camping.
Battery Switch Operation Flowchart
[Imagine a flowchart here. The flowchart would have several entry points representing different scenarios (e.g., arriving at campsite, leaving campsite, storing trailer). Each scenario would lead to a different position on the battery switch (e.g., “Both Batteries,” “Storage,” “Battery 1”). Arrows would connect the different scenarios and switch positions, clearly illustrating the appropriate procedure.] For example, “Arriving at Campsite” would lead to “Both Batteries,” while “Storing Trailer” would lead to “Storage.” The flowchart would also include considerations like charging batteries from shore power.
Troubleshooting Battery Switch Problems
Your travel trailer’s battery switch is a crucial component, and problems can leave you stranded. Understanding common issues and how to troubleshoot them is essential for maintaining power and enjoying your trips. This section will guide you through identifying and resolving the most frequent problems.
Corrosion on Battery Terminals and Switch Contacts
Corrosion is a common culprit in battery switch malfunctions. It builds up over time due to exposure to the elements and chemical reactions between the metal and the battery acid. This buildup creates resistance, preventing proper current flow and potentially causing overheating or even a complete loss of power. Symptoms include weak lights, slow cranking, or a complete inability to draw power from the battery.
The causes are primarily environmental exposure (moisture, salt air) and the natural chemical processes within the battery system.Troubleshooting involves a thorough visual inspection of the battery terminals and the switch contacts themselves. Look for a white, green, or blue powdery substance. If corrosion is present, use a wire brush or a battery terminal cleaner to remove it.
Apply a corrosion inhibitor afterwards to prevent future buildup. A simple multimeter test can confirm whether the connection is good after cleaning. If the resistance is significantly high, it indicates a persistent problem requiring further attention.
Loose Connections
Loose connections at the battery terminals, the switch itself, or the wiring leading to the switch can interrupt the electrical circuit. This can lead to intermittent power loss, flickering lights, or a complete lack of power. The cause is often vibration during travel or improper installation.Troubleshooting begins with a visual inspection of all connections. Tighten any loose nuts or bolts using the appropriate tools.
Ensure that all wire ends are securely attached and that no wires are frayed or broken. Pay close attention to the ground connection, which is often overlooked but crucial for proper electrical flow. Again, a multimeter can help verify the connection is sound after tightening.
Faulty Battery Switch
The switch itself can fail due to wear and tear, corrosion, or internal damage. Symptoms include a complete inability to switch power on or off, or intermittent power loss regardless of the switch position. The cause can be many things, including years of use, exposure to the elements, and even accidental damage.Troubleshooting a faulty switch requires testing the continuity of the switch in its different positions.
Use a multimeter to check for continuity between the input and output terminals when the switch is in the “on” position. There should be near-zero resistance. If there is no continuity or if there is continuity when the switch should be “off”, the switch needs replacement. This involves disconnecting the wiring, carefully removing the old switch, and installing a new one of the same type and rating.
Troubleshooting Guide
- Problem: Corrosion on battery terminals and switch contacts. Solution: Clean terminals and contacts with a wire brush or battery cleaner, apply corrosion inhibitor.
- Problem: Loose connections at battery terminals or switch. Solution: Tighten all connections; check for frayed or broken wires.
- Problem: Faulty battery switch. Solution: Test switch continuity with a multimeter; replace if necessary.
Battery Switch Maintenance and Safety

Keeping your travel trailer’s battery switch in top condition is crucial for reliable power and preventing costly repairs. Regular maintenance not only extends the life of the switch but also ensures your safety when working with electrical systems. Neglecting maintenance can lead to corrosion, poor connections, and even fire hazards.Proper maintenance and safe handling are key to avoiding problems with your battery switch.
This section Artikels recommended practices to keep your system functioning smoothly and safely.
Regular Maintenance Procedures
A simple inspection and cleaning routine can prevent many problems. Ideally, you should inspect your battery switch at least twice a year, more often if you live in a humid or salty environment. This involves visually checking for corrosion on the terminals and the switch itself, loose connections, and any signs of damage. Look for any discoloration, bulging, or cracking of the plastic housing.
If you notice anything amiss, address it immediately.
Safety Precautions When Working with Battery Switches, Battery switch on travel trailer function
Working with batteries and electrical components always carries a risk of injury. Before beginning any maintenance, disconnect the negative terminal of your house battery first. This prevents accidental shorts and protects you from electrical shock. Always wear safety glasses to protect your eyes from potential sparks or acid splashes. If you’re unsure about any aspect of the process, consult a qualified electrician.
So, you’re an audiophile who travels? Awesome! Check out this guide on setting up your audiophile travel setup for amazing sound on the go. It’s crucial to protect your gear, though, so don’t forget travel insurance! Getting Aon travel insurance is a smart move to cover any mishaps with your precious equipment while you’re exploring new places.
That way, you can enjoy both incredible music and peace of mind during your adventures.
Remember, safety should always be your top priority.
Preventing Accidents and Damage
Preventing accidents involves understanding how the battery switch works and following safe practices. Never force the switch; if it doesn’t move easily, investigate the cause. A stiff switch might indicate corrosion or a mechanical problem. Avoid touching the terminals while the switch is on, and always ensure the switch is turned off before performing any maintenance. Store corrosive chemicals, such as battery acid, safely away from the battery switch to prevent accidental spills.
Cleaning and Lubricating Battery Switch Contacts
Corrosion is the biggest enemy of battery switches. To clean the contacts, first disconnect the negative terminal. Then, use a wire brush or sandpaper to gently remove any corrosion from the terminals and the switch contacts. Be careful not to damage the metal surfaces. After cleaning, apply a small amount of dielectric grease to the contacts.
This grease prevents corrosion and ensures a good electrical connection. Avoid using petroleum-based lubricants, as they can attract dirt and damage the switch over time. After applying the grease, reconnect the negative terminal, ensuring a tight connection.
Battery Switch Integration with other Systems
Your travel trailer’s battery switch isn’t an isolated component; it’s a crucial junction in your electrical system, influencing how power flows between your batteries, solar panels, inverter, and other appliances. Understanding its interaction with these systems is key to maximizing efficiency and preventing problems. This section will detail how your battery switch interacts with various electrical systems, impacting performance and offering different integration approaches.The battery switch acts as a central control point, determining which circuits are powered by your house batteries and which are isolated.
Its position directly affects the availability of power to various components and the overall performance of your electrical system. Incorrect switch settings can lead to unexpected power outages, drained batteries, or even damage to sensitive electronics.
Battery Switch Interaction with Solar Panels
Solar panels generate DC power, and this power needs to be routed to charge your house batteries. The battery switch is typically placedafter* the solar charge controller. The controller regulates the charging process, preventing overcharging. The switch then allows you to disconnect the solar panels from the batteries when necessary, for example, during storage or maintenance. This prevents the batteries from potentially discharging through the solar panel system if there is a fault.
Battery Switch Interaction with Inverters
Inverters convert DC power from your batteries into AC power for running appliances like microwaves and air conditioners. The battery switch controls whether the inverter can access the house batteries. With the switch in the “off” position, the inverter is completely isolated, preventing accidental battery drain even if the inverter is turned on. In some setups, the inverter might have its own dedicated circuit breaker, providing an additional layer of safety.
Battery Switch Interaction with Charging Systems
Your travel trailer likely has a charging system connected to your tow vehicle, allowing you to recharge your batteries while driving. The battery switch is placedbefore* the charging system. This allows you to disconnect the charging system from the batteries when not needed, preventing potential overcharging or backfeeding issues. Some charging systems have their own switches or breakers, offering additional control.
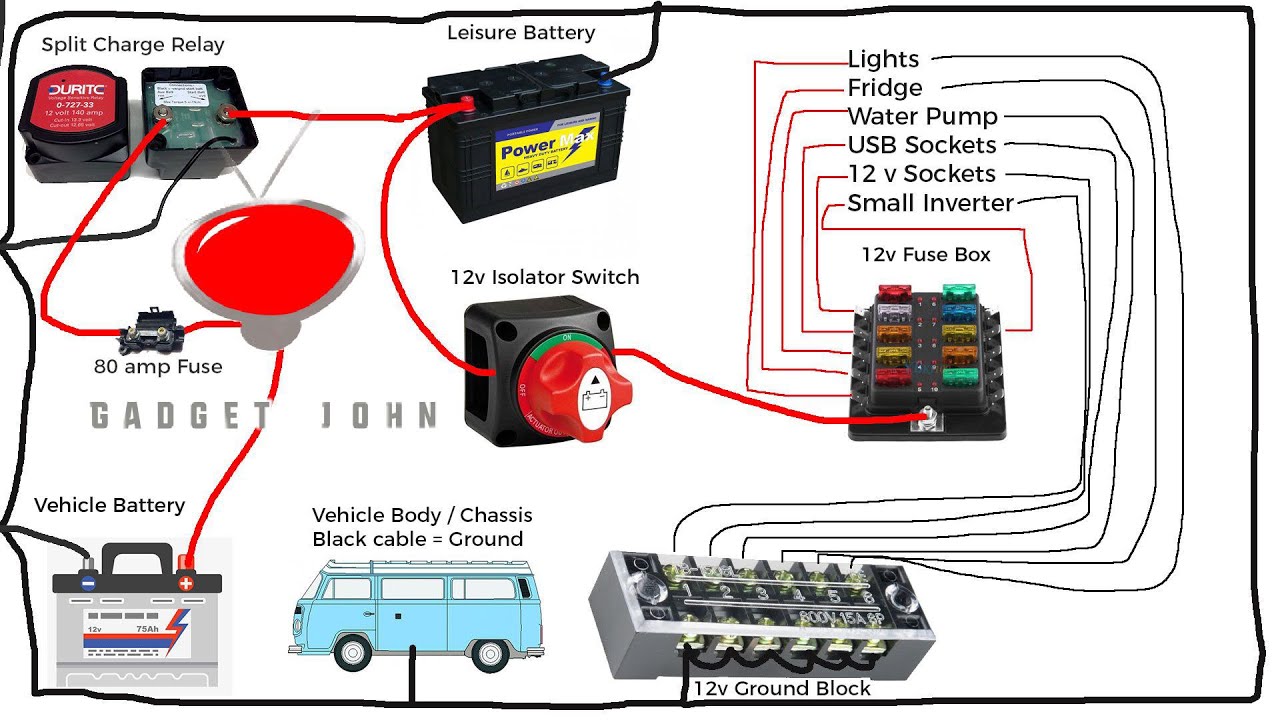
Diagram of a Typical Travel Trailer Electrical System
Imagine a simple diagram. We have five main blocks:
1. Solar Panels
These generate DC power from sunlight.
2. Solar Charge Controller
This regulates the flow of power from the solar panels to the batteries, preventing overcharging.
3. Battery Switch
This acts as a master on/off switch for the house batteries.
4. House Batteries
These store the DC power.
5. Inverter
This converts DC power from the batteries to AC power for household appliances.
The flow of power would be: Solar Panels -> Solar Charge Controller -> Battery Switch -> House Batteries -> Inverter. The battery switch sits at a crucial point, controlling the flow of power from the solar panels and to the inverter. Additional circuits for the tow vehicle charger would connect to the battery switch, similarly to the solar panel connection.
Each component typically has its own circuit breaker or fuse for additional protection.
Mastering your travel trailer’s battery switch is more than just knowing how to flip a switch; it’s about understanding your RV’s electrical system and maximizing its efficiency. By following the advice in this guide, you’ll be confident in managing your power, preventing costly problems, and extending the life of your batteries. Hit the road with peace of mind, knowing you’re prepared for anything!
FAQ Resource: Battery Switch On Travel Trailer Function
What happens if I leave my battery switch on all the time?
Leaving your battery switch on constantly can drain your batteries, especially if you have parasitic draws (small electrical loads that consume power even when devices are off). It’s best to turn it off when not using the trailer for extended periods.
How do I know which battery is being used with a dual battery switch?
A dual battery switch typically has positions for “both,” “battery 1,” “battery 2,” and “off.” The position you select determines which battery (or batteries) is supplying power.
My battery switch is corroded. Can I clean it myself?
Yes, you can carefully clean corroded battery switch contacts with a wire brush and baking soda solution. Disconnect the battery before cleaning. If the corrosion is severe, replace the switch.
How often should I check my battery switch?
Regularly inspect your battery switch for corrosion, loose connections, and damage. A visual check every few months, especially before and after long trips, is a good practice.
